
If you are owning an old monitor which is obviously fully functional but you never use it because of its low-resolution display and a lack of digital interfaces then without throwing it away, you can definitely set up Raspberry pi with this monitor and use it as an All-In-One PC. How? Let’s find it…
What Is an All-In-One PC? & Why to Use Raspberry Pi?
Definitely an All-in-one PC has to have all the components that a fully functional PC has to work with. Such as CPU, Motherboard, RAM, HDD or SSD, PSU, everything and of course, the monitor. Surprisingly all of these components except PSU are integrated into a single board which is the Raspberry Pi here, to be specific Raspberry Pi 4.
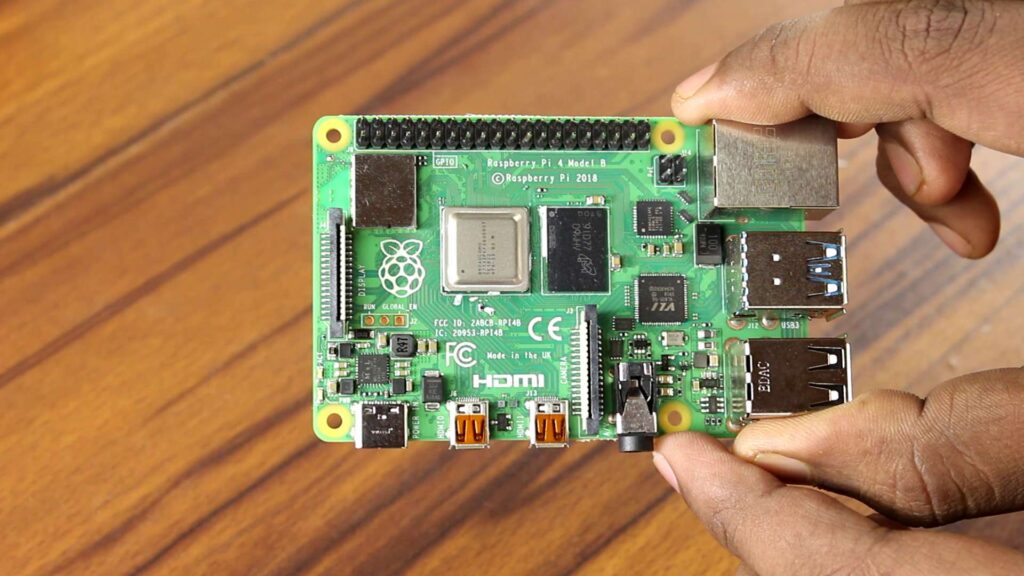
The RAM variant we are choosing is 4GB. This board offers 2 USB 3.0, 2 USB 2.0 port, one-gigabit LAN port, 2 mini HDM port. So, a bunch of inputs and outputs are available.
How to Connect the Raspberry Pi with the Monitor?
To make the Raspberry Pi all in one PC, first problem I’ve faced is, the display interface that this raspberry PI uses is not as same as the monitor I am using. Monitor uses VGA and Raspberry Pi 4 uses mini-HDMI.
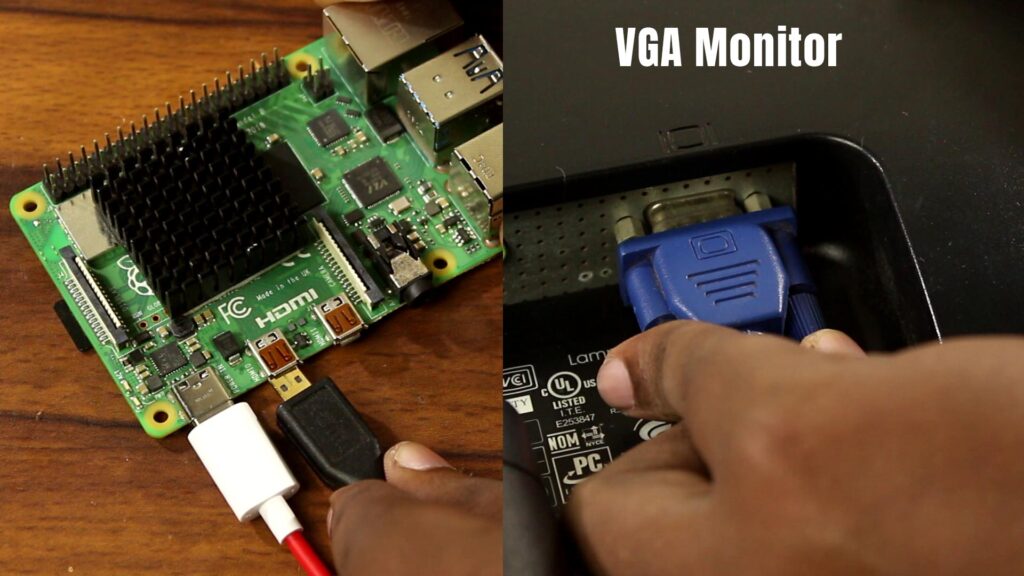
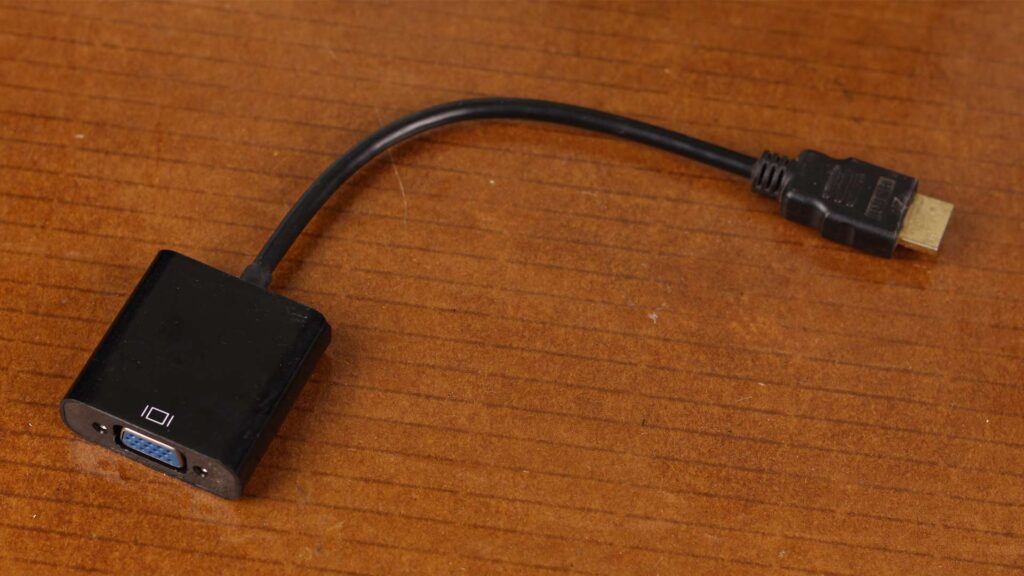
So, I have picked a cheap HDMI to VGA converter along with a HDMI female-to-female extender and a mini-HDMI to HDMI cable to get the job done.
To complete the connection, I have connected the mini-HDMI side of this cable into the Raspberry Pi and the HDMI side will be connected with an HDMI extender.

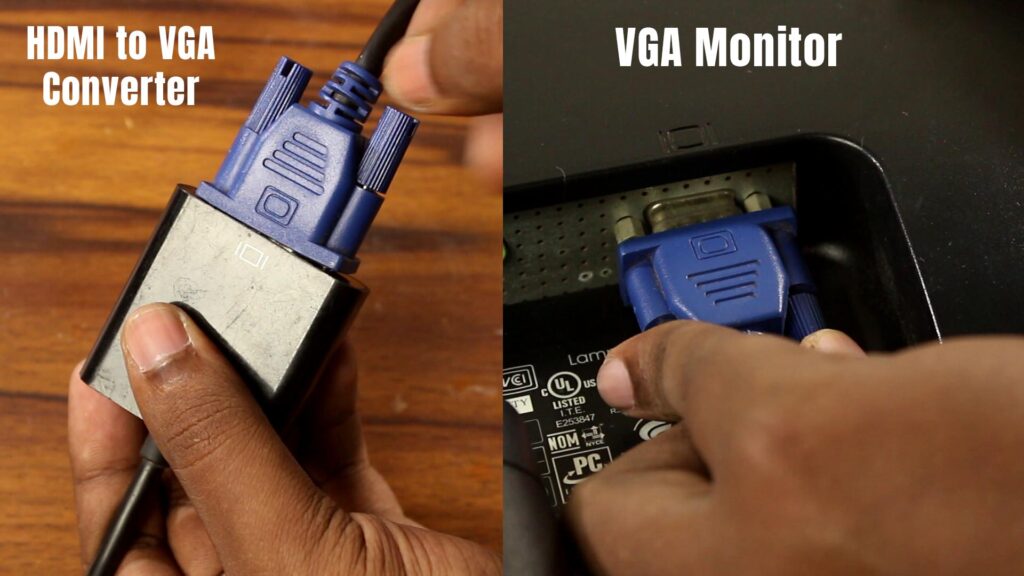
After connecting the HDMI to VGA converter, I can easily connect my VGA monitor with the Raspberry Pi 4.
Best Power Supply for Raspberry Pi 4
Of course, this is a power-hungry project. We are making a fully functional PC with the Raspberry Pi and most importantly we’re going to overclock it so, we at least need 5V 3 Amp power supply but unfortunately, I don’t have any so I stick with 5V 2 Amp one and you know that the performance of this machine will be limited for this.
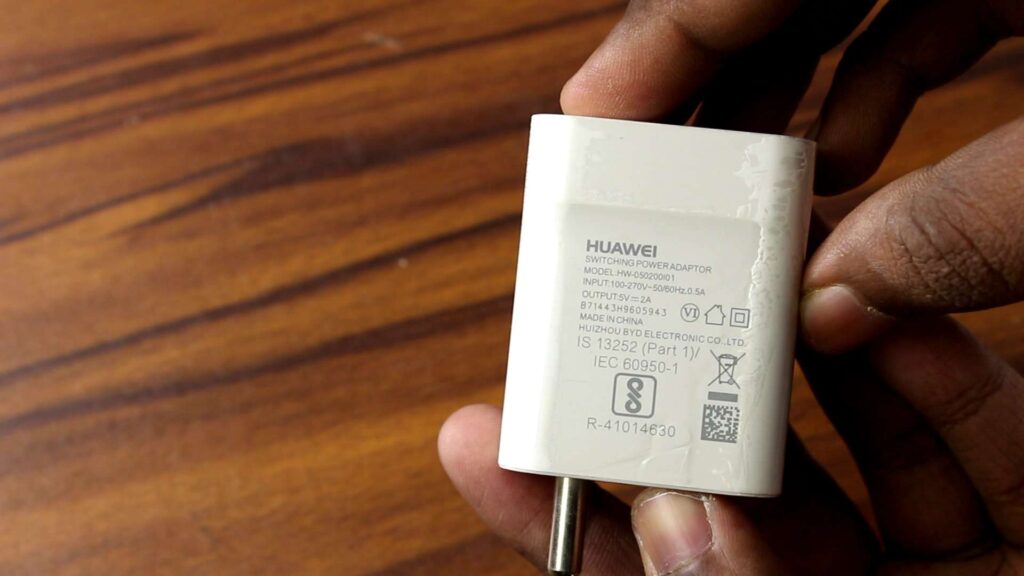
Oh, one thing you have to remember; not only the power supply should be good but also the power cable you’re using should be rated properly to handle 3Amps of current otherwise the wire may heat up & may be got melted or maybe the Raspberry Pi can’t take the required power from the adapter.
Install the Operating System on the Raspberry Pi 4
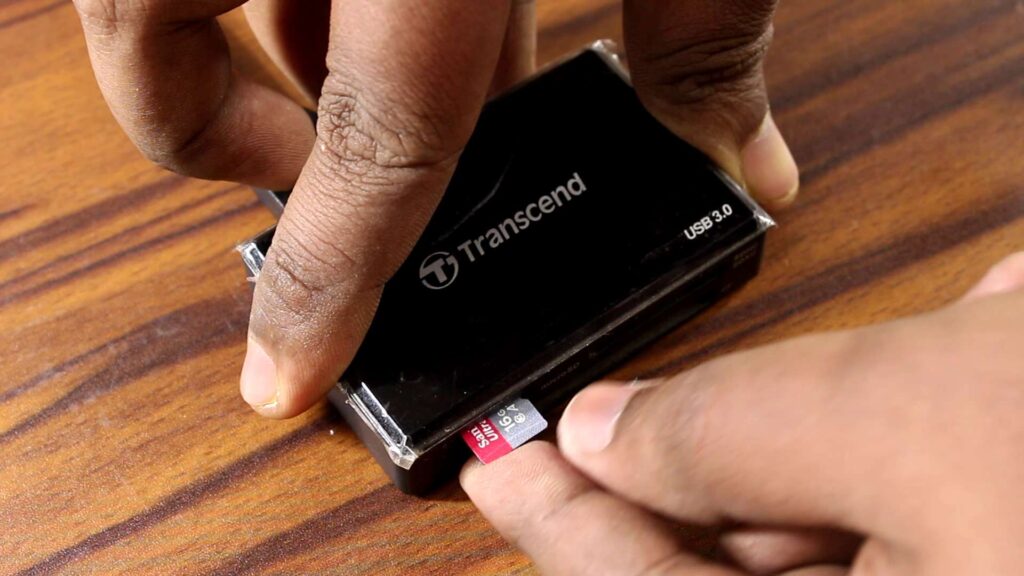
After completing the hardware setup, we just need a micro-SD card to store the operating system that we’re going to use. Class 10 micro-SD card is definitely recommended for the performance.
Choosing the Operating System:
Pick up the correct operating system that doesn’t load the Raspberry Pi too much, can provide good performance and can handle all the daily-to-daily tasks. So, after doing a bit of research and trying some of the operating systems, I have decided to use Twister OS for this project.
If you’re a Windows or Mac user, you can’t feel any problem using the OS. It uses these two most popular operating system’s themes for the user’s convenience.
Installing Twister OS on Raspberry Pi 4
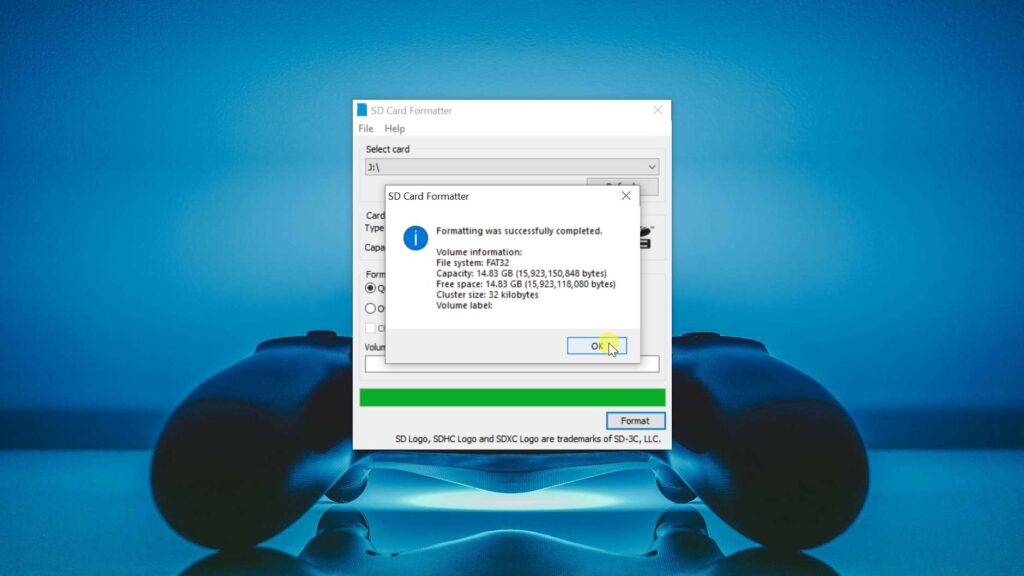
The installation process is pretty simple and straightforward. Visit Twister OS.com which is the official website of this OS. Go to the download section and download the latest release. It takes some time to complete. In the meantime, we need to ready our SD card so I just insert the micro-SD card to my computer and format it with ‘SD card formatter‘.
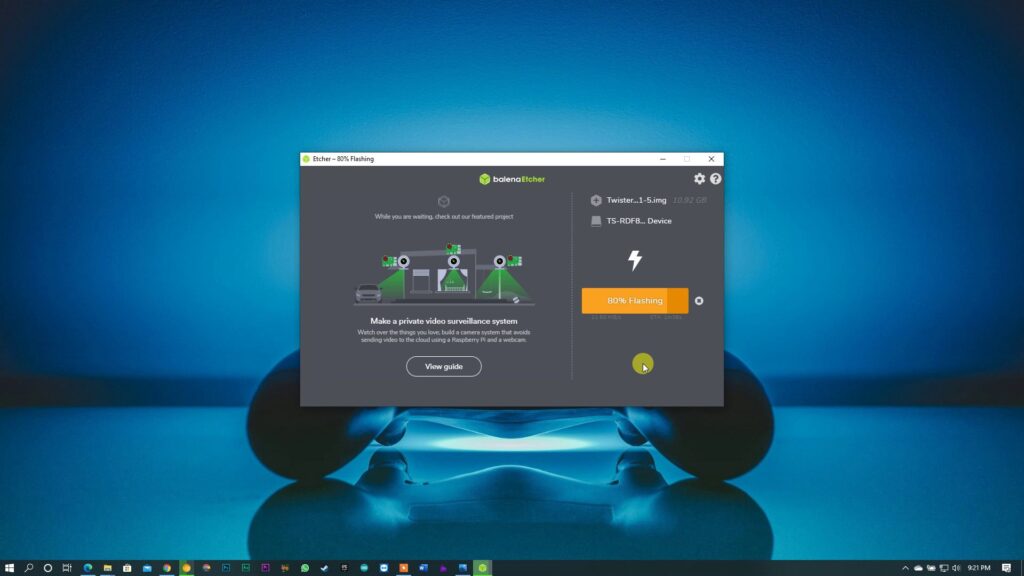
After getting the main file, I have unzipped it, and using ‘Balena etcher’, I have flashed the image file into the SD card. When it was done, I have inserted the SD card into the Raspberry pi and powered it up.
Solve Twister OS Resolution Problem
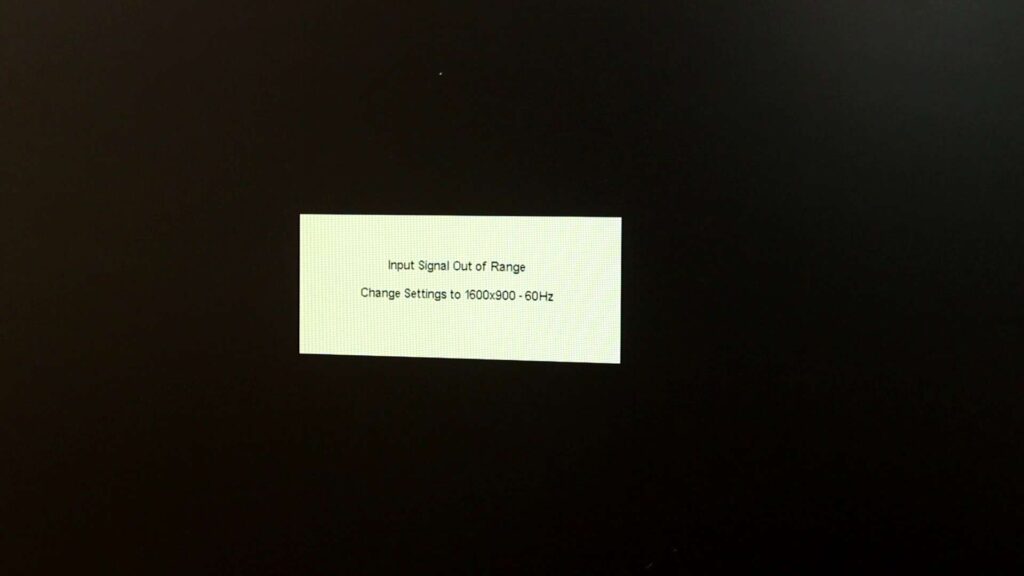
After powering the hole constellation, surprisingly there is no display coming into the monitor. Instead, I got this ‘input signal out of range’ so I immediately realize that this is the problem of resolution. The operating system can’t adapt the monitor resolution properly so I have to set it manually. For that, I have connected the raspberry pi to my 1080P monitor and this time, everything works fine. Now to control the machine, I have just added a keyboard and mouse to the system.
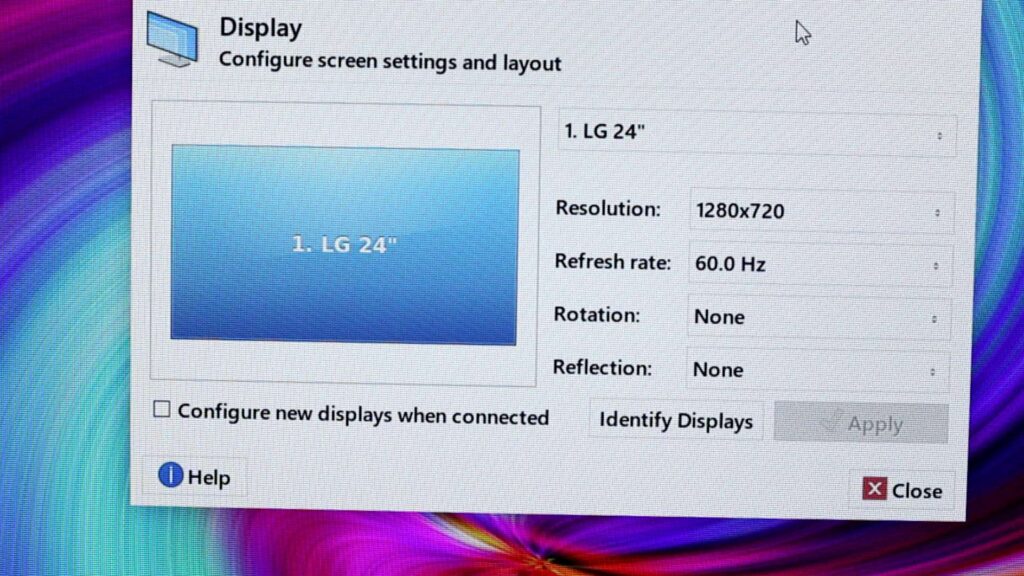
Remember, if the system wants a password, use ‘raspberrypi’ to log-in to the OS. Now we need to reduce resolution into 720P. For that, go to the start menu > settings > display & lastly, set the resolution on 1280X720, and also put a tick here so that when you connect a new monitor the OS automatically detects the suitable resolution for it. Then I have shut down the system, turned off the adapter and fit this hole constellation with the old monitor and voila! there’s no problem to get the display in it.
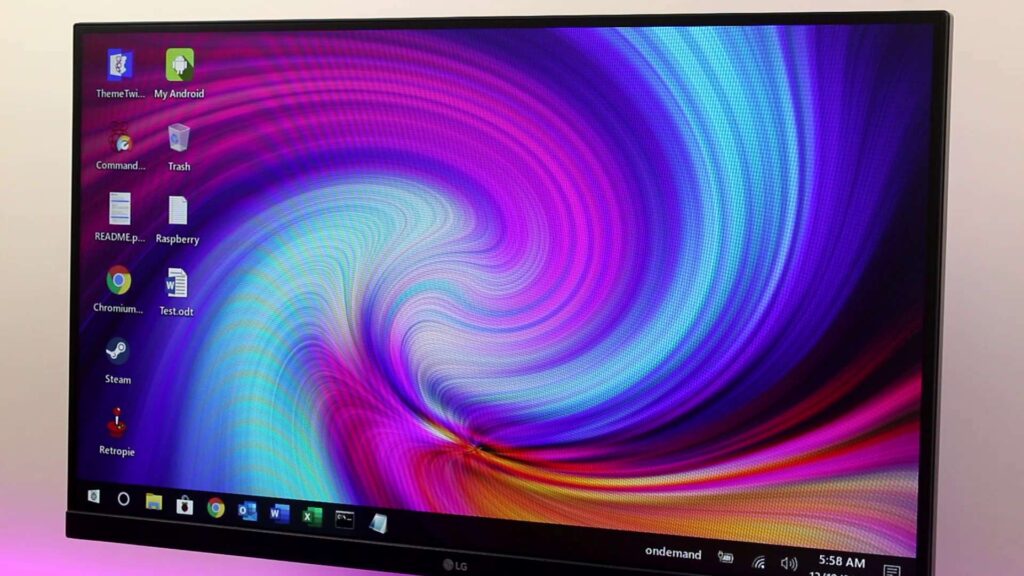
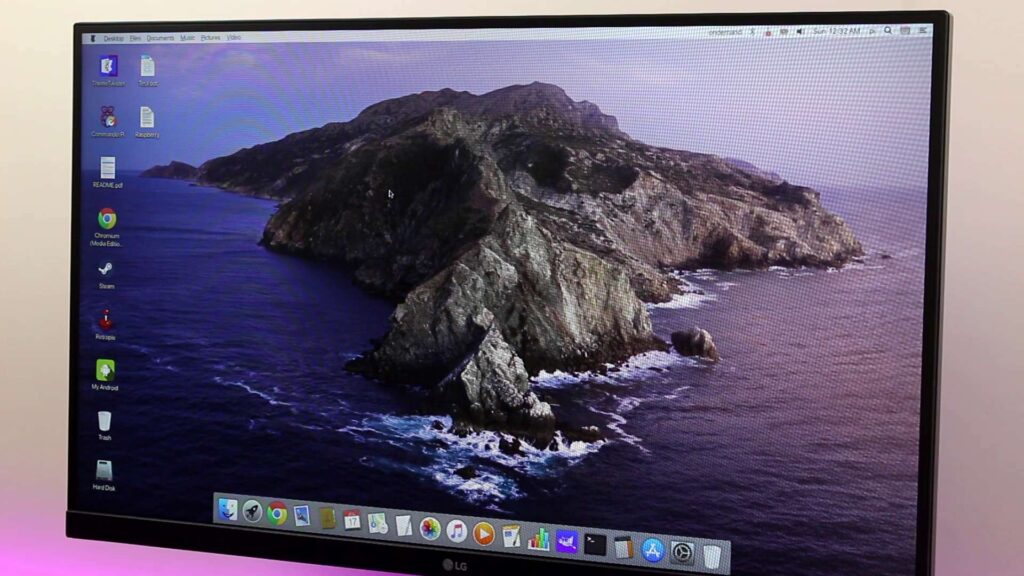
Features of Twister OS
It’s better to say that this OS can handle every daily-to-daily task like browsing, watching movies or web series, writing documents and even this OS is also pretty good for programing. And if you’re habituated with Windows or Mac then with this distro, you can not only get the feel of both of them but also get many other operating systems too. You can switch between them easily by using the ‘theme twister’ application which is obviously provided by the twister OS developers. Although because of the legal issues, twister OS developers have changed some of the icons and visuals in the operating system which you will find very easily during the use.
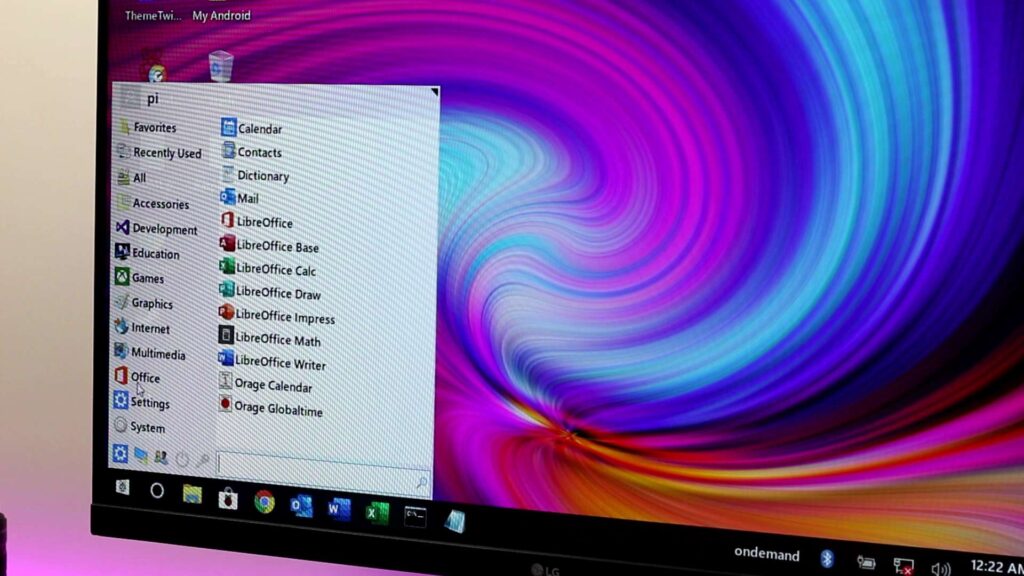
One thing I should let you know that in terms of browsing, you find two different chromium version with this OS. If you’re going to watch media content like YouTube Amazon Prime Video etc. then go for ‘Chromium media edition’ and if for normal internet surfing, normal version is the best choice. Here, I am not spoiling the OS features for you. Just go and use it. In my opinion, it’s awesome.
Let’s build the All-In-One PC
To take this project to an end, we need to put all the components on a single chassis to complete our goal compact and fancy. So, we need a perfect and small enclosure for that and it should be attached with the monitor’s back.

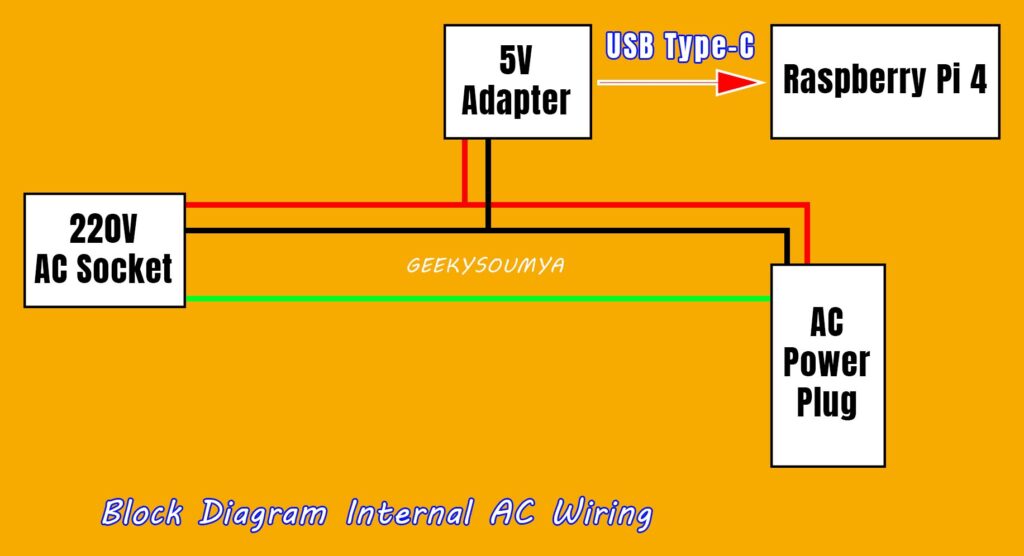
Here, we only provide the power to the enclosure where it is divided into two lines; one is for this adapter that reduces and converts the AC voltage to 5V DC and the other one gets out from the chassis and provides the 220V to the monitor. And every Raspberry Pi I/Os are exposed to the enclosure body so that anything can be connected with the pi without any problem.
Fitting the Raspberry Pi
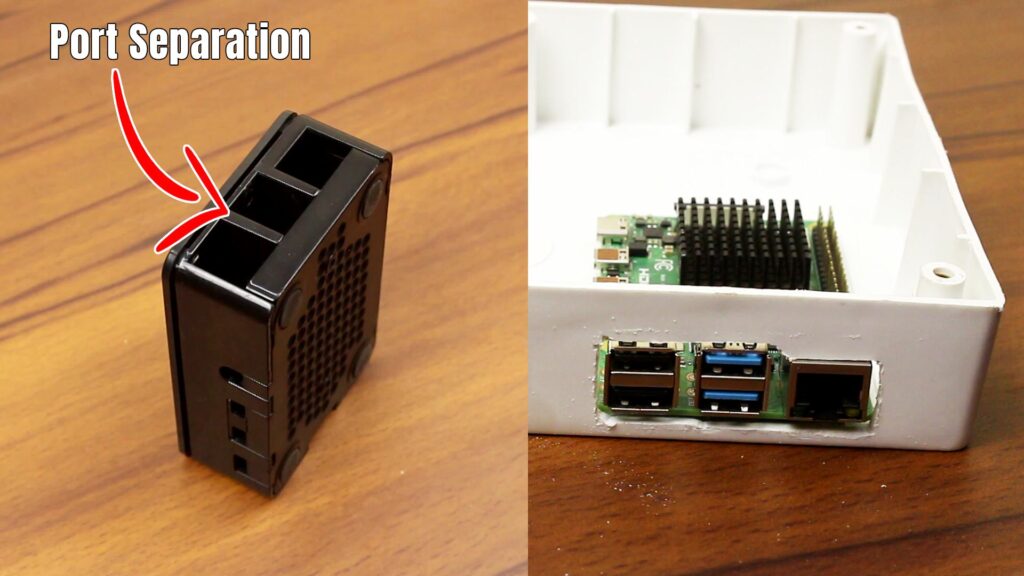
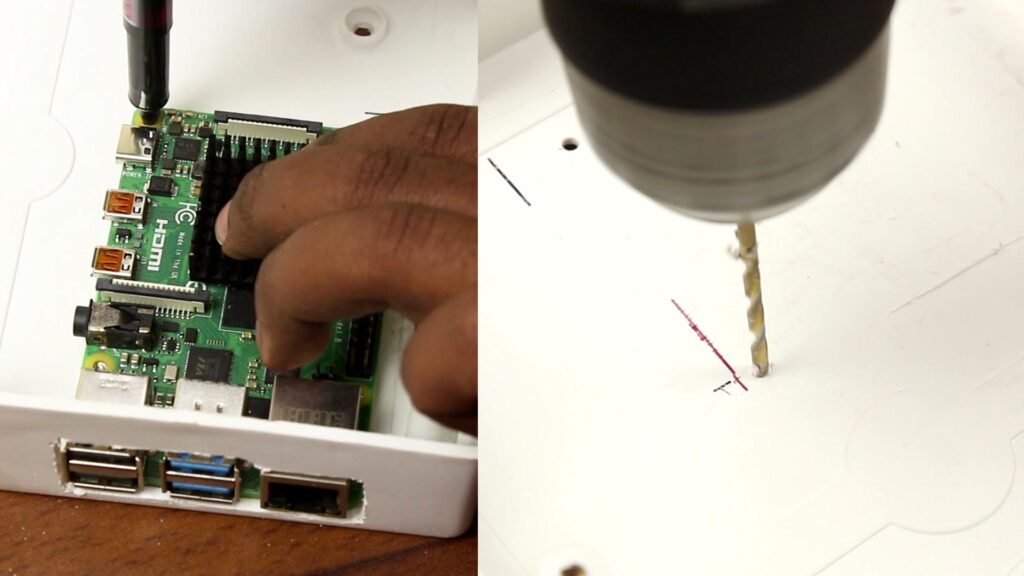
To expose the Pi’s, I/Os, we will cut the enclosure according to the ports’ layout. So, I have tapped masking tape on the opening of an old Raspberry Pi 4 enclosure and marked the layout of the cuts on the masking tape.
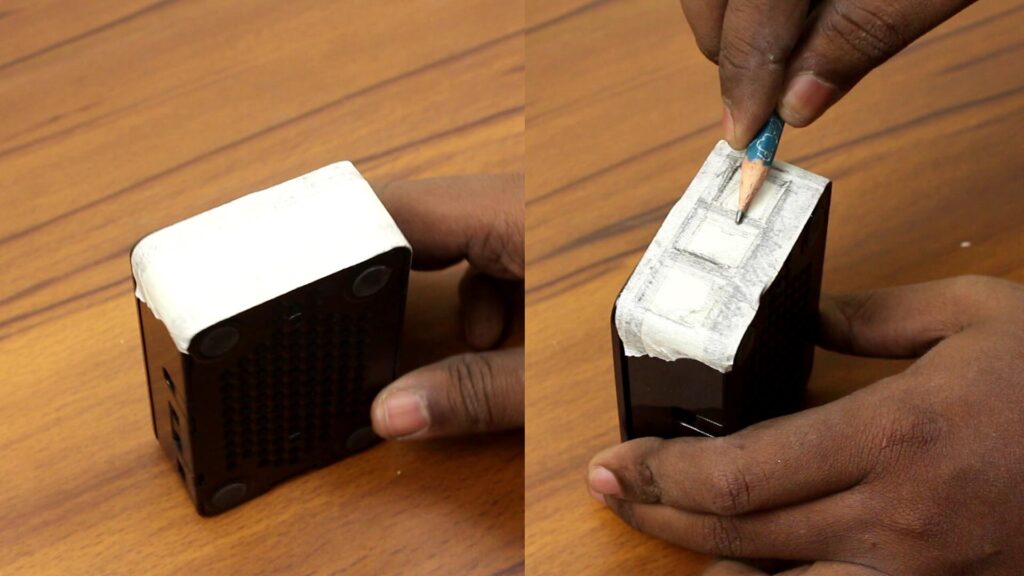
Then I have removed the masking tape from the Pi box and stick it on the new enclosure.
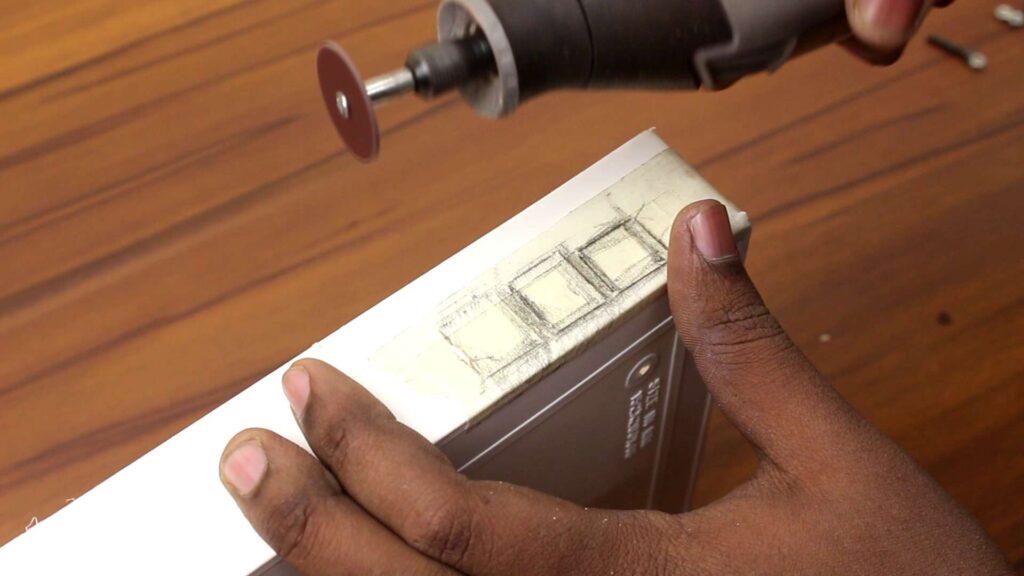
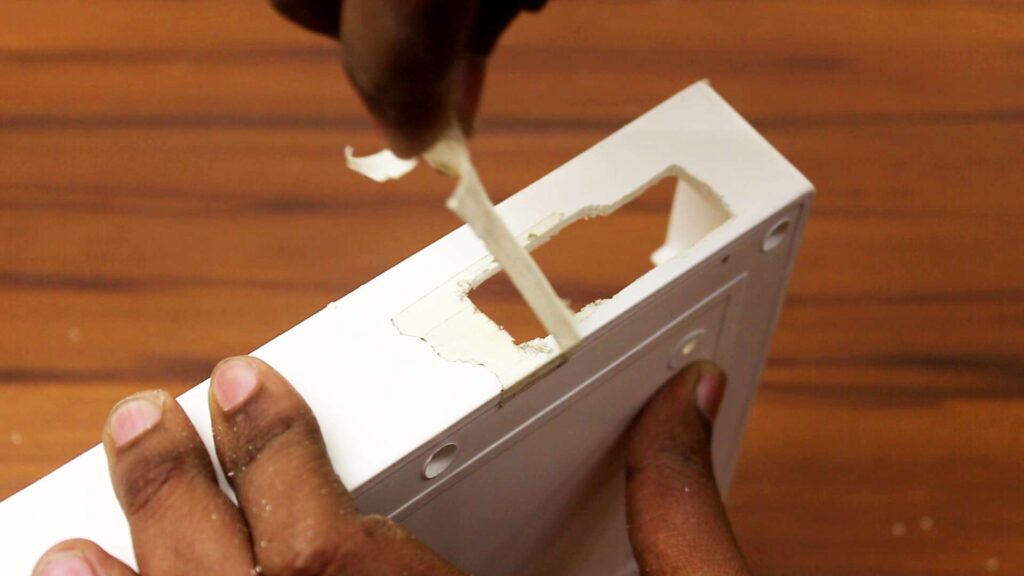
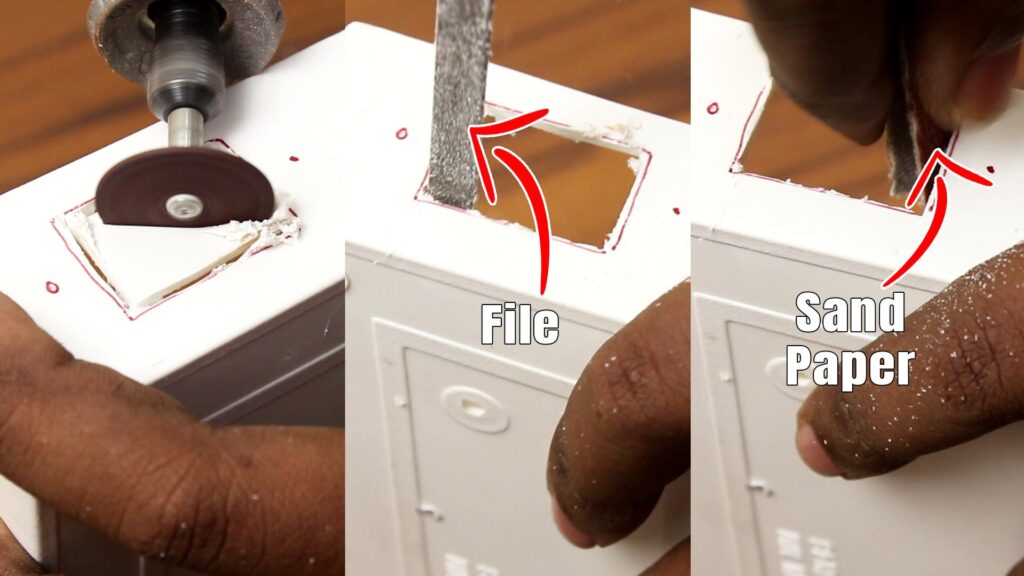
Afterward, using my rotary tool, I have taken out the guts from our enclosure then a bit of file treatment has been done for better finishing.
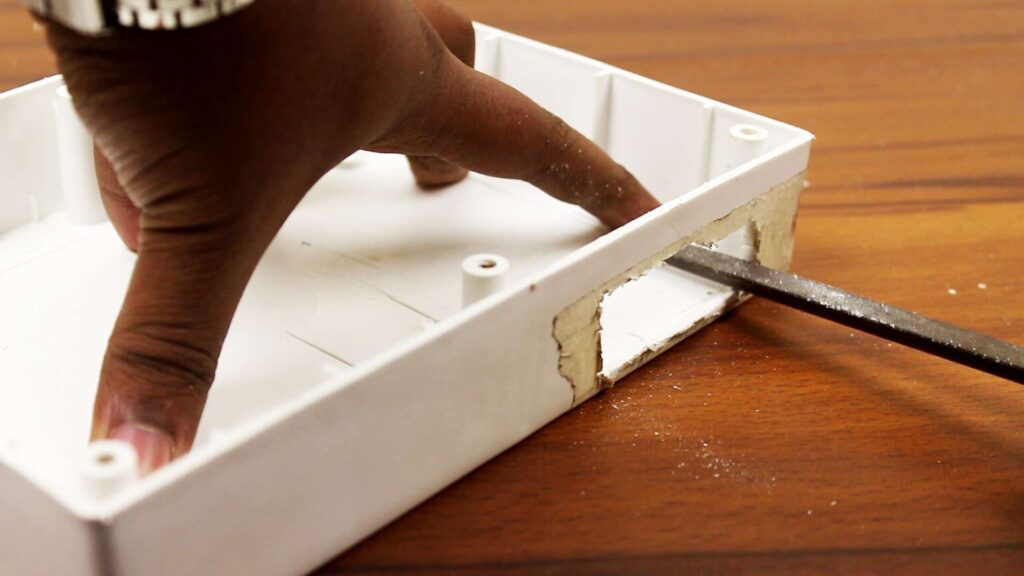
If you don’t have the premade Raspberry pi 4 enclosure like me then you can measure every port dimension to accurately cut the openings. Although I have not done the cutting perfectly, I accidentally broke the separation part, but still, it looks fine, and also these spaces will be used later for the ventilation.
lastly, I removed the masking tape and again did some file treatment to get maximum possible finishing.
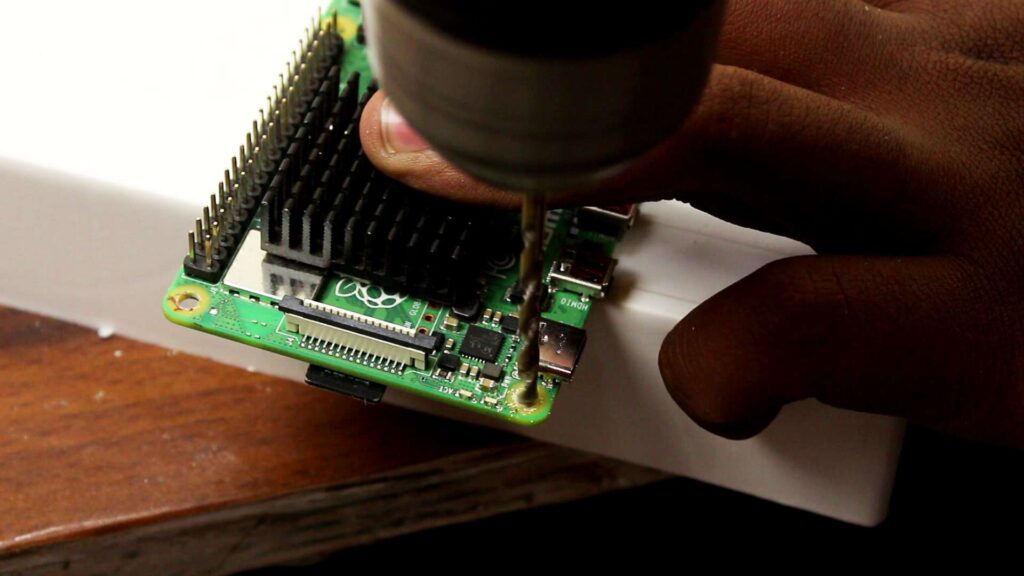
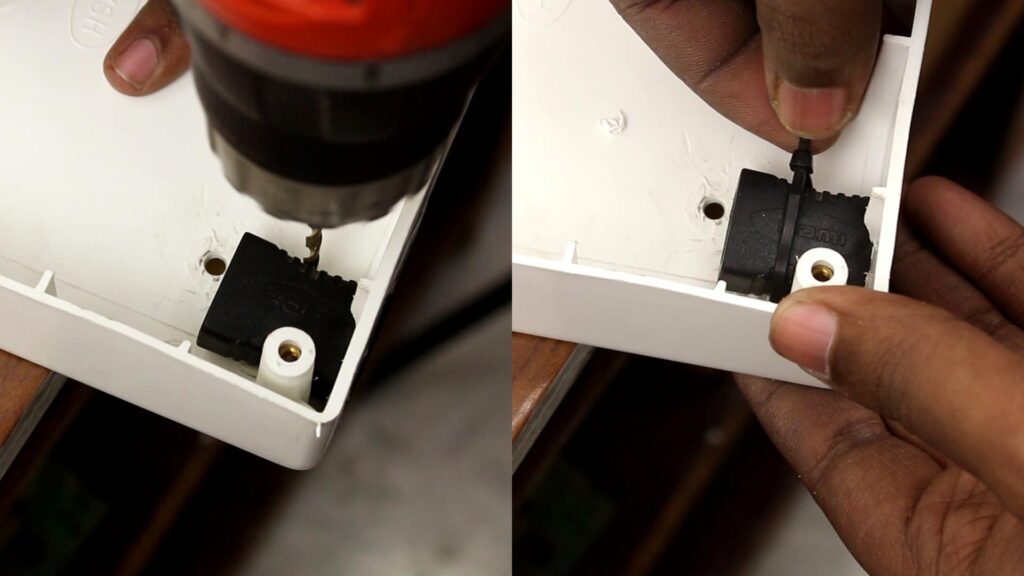
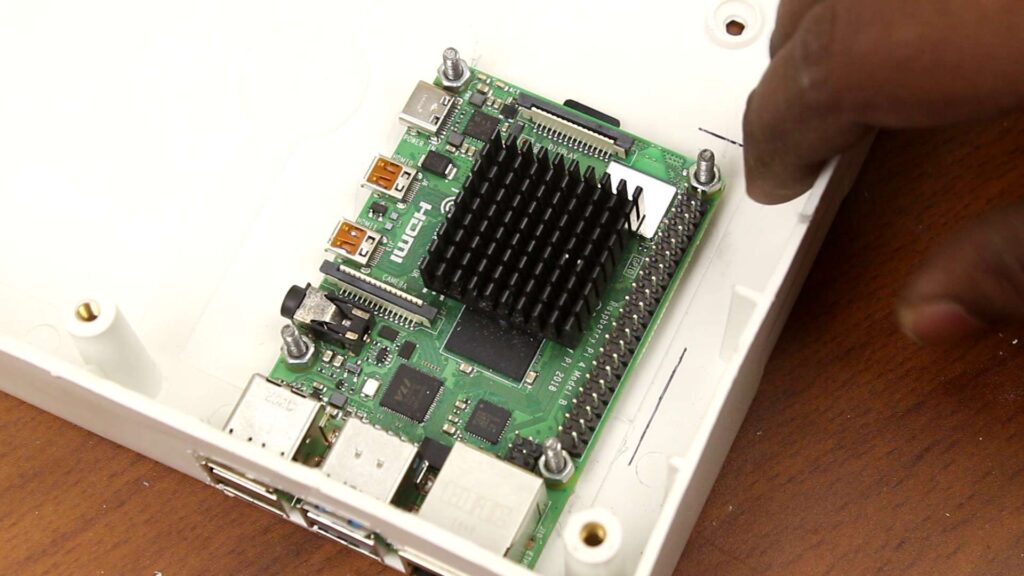
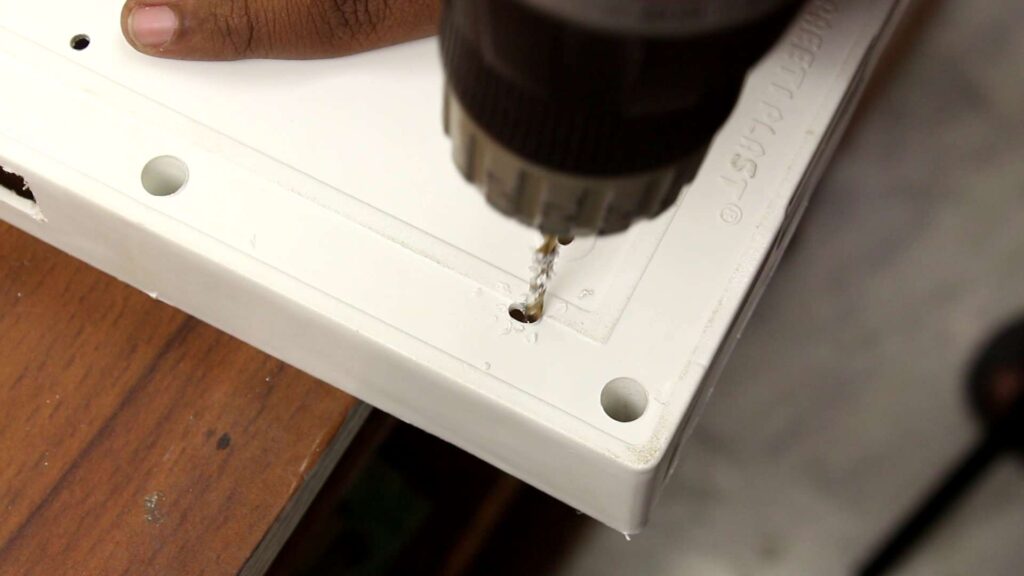
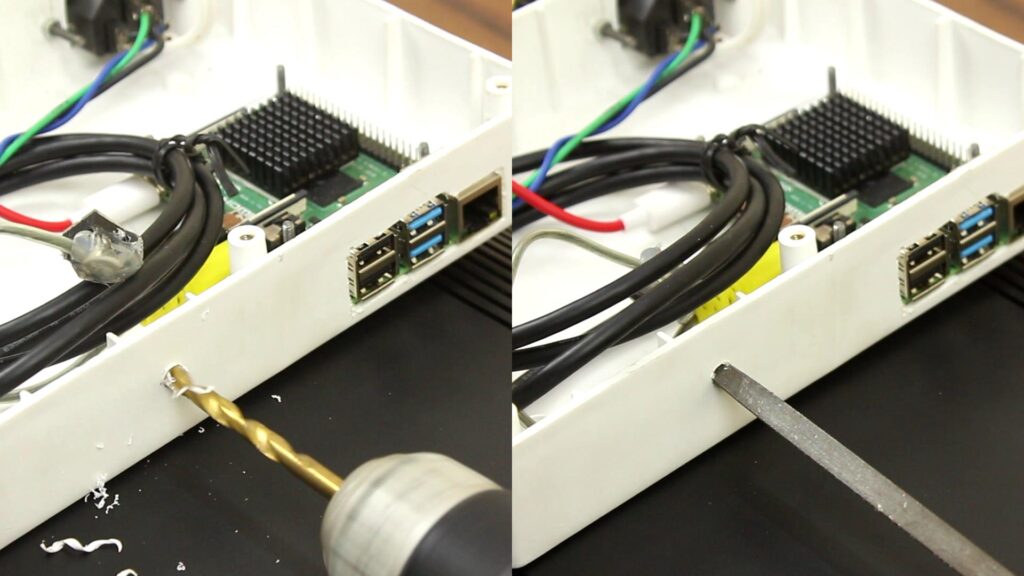
Now openings are ready it is time to secure the Raspberry Pi with the case. So, I positioned the pi, traced its screw mark and drilled on those marks.
I also enlarged the mounting holes of the Pi and please don’t mount the Raspberry Pi right now because lots of other things will left to be done with the box so one mistake can damage the single board computer.
Mounting AC Socket on the Chassis
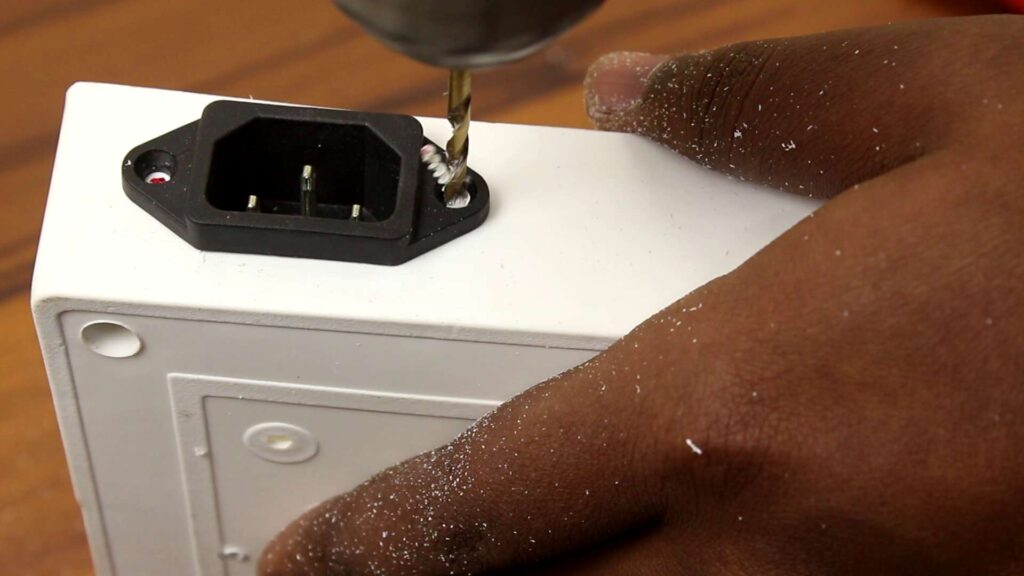
Now, let’s start with the AC power connector. First, we remove the unwanted plastic to create the space for the socket by using my rotary tool and by using sandpaper I have smooth down the edges of the socket hole.
To securing the socket in place I have drilled two holes by following its mounting position using by trusty drill machine.
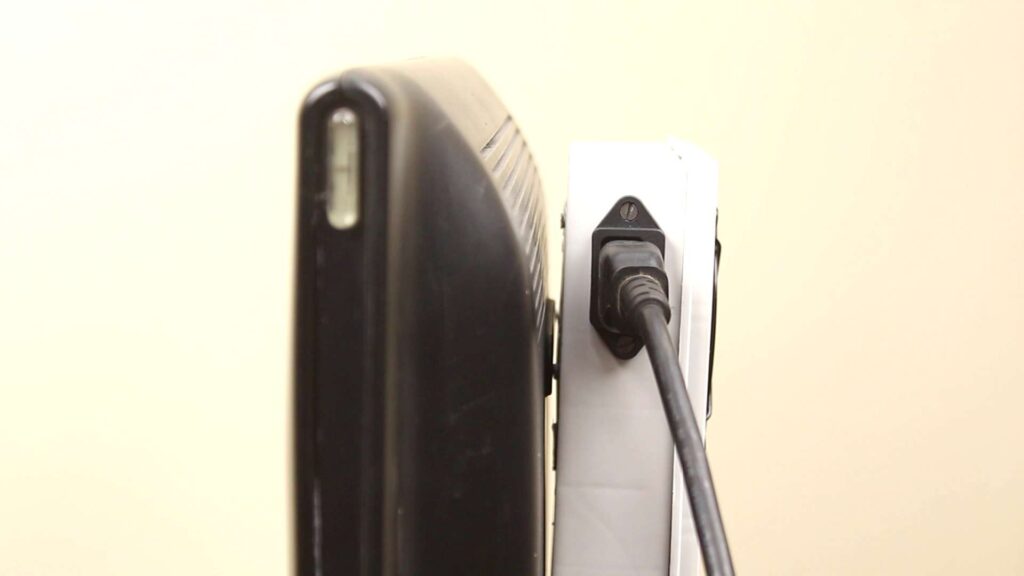
Fitting Display adapter
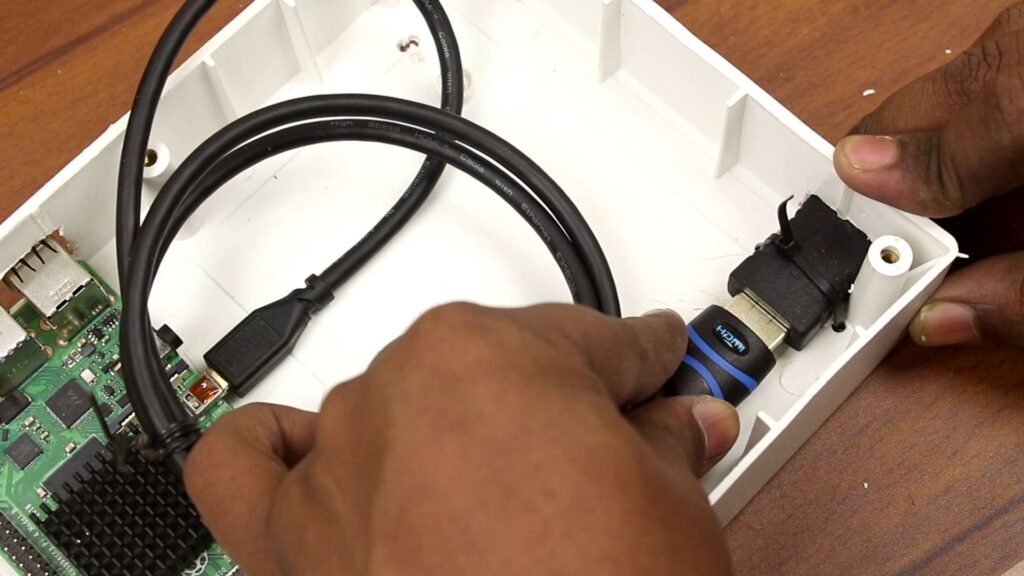
Next, we need to expose an HDMI port outside of the housing. I used this HDMI-to-HDMI converter for the job. Put the connector in place, mark it, cut the groove using the rotary tool and file, place the converter on double-sided tape which I have stick on the place of the converter.
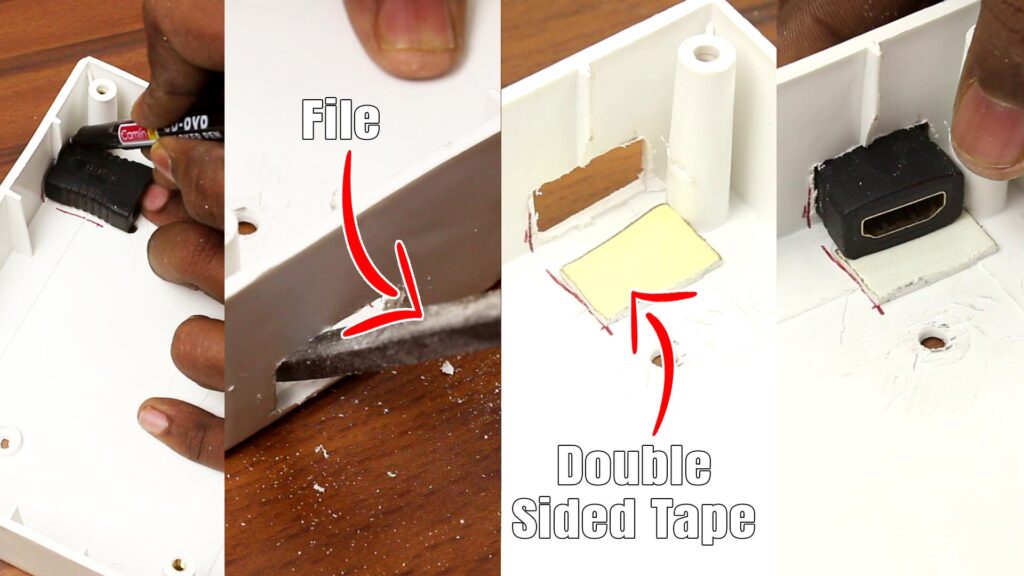
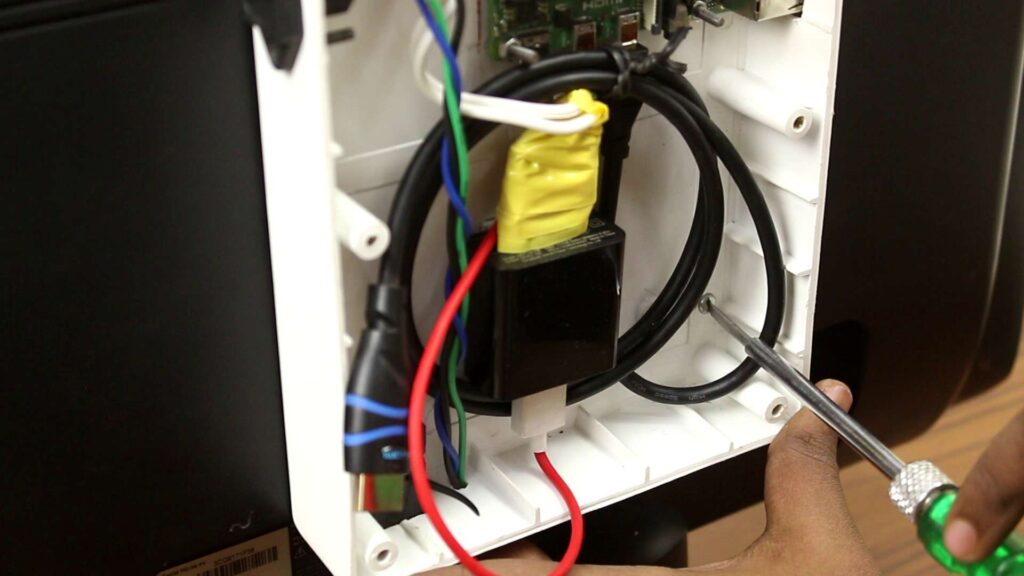
Then I drilled holes on both sides of the converter as close as possible and using the zip tie I have tighten the converter in place.
Now I can say that the converter is pretty safe to plug in and plug out anything, it is pretty steady now.
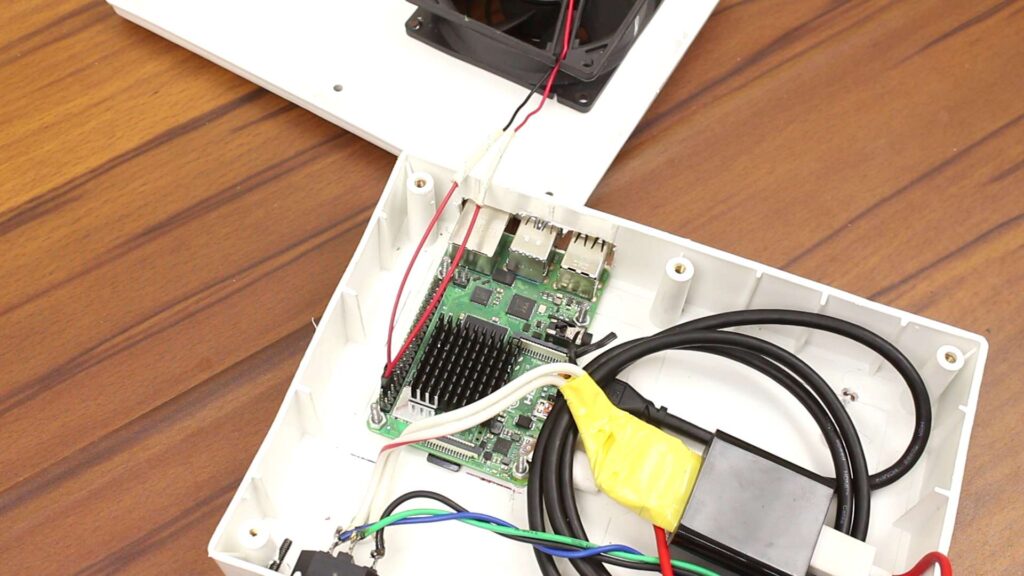
Putting all the Components Together
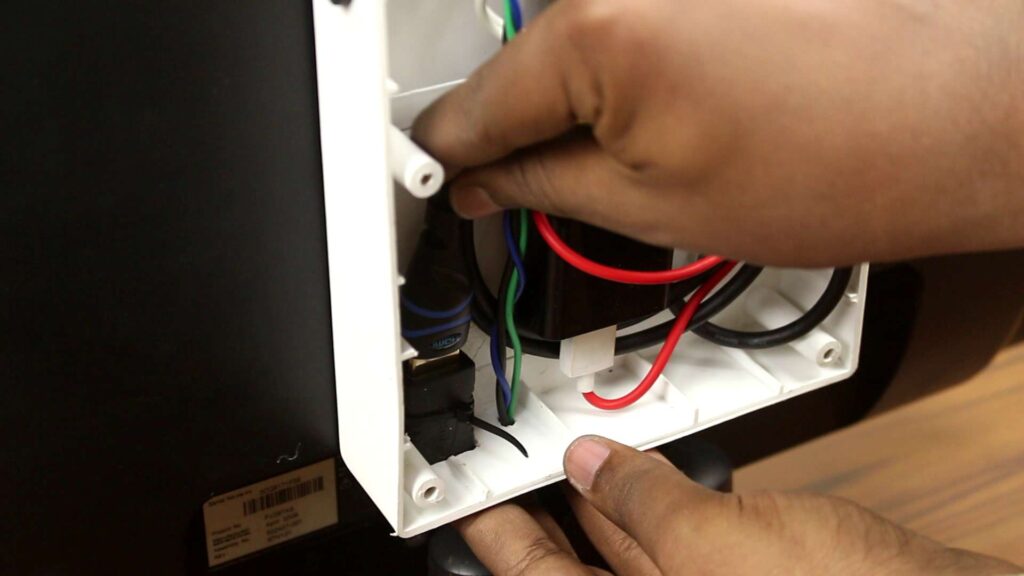
Ok, let’s set up the Raspberry Pi. First, I put the bolts into the mounting holes, then as a spacer between the enclosure and the pi I have used 4 different nuts, tightened them a bit.
Now slid the pie through the bolts and put 4 more nuts on the bolts and tighten them together.
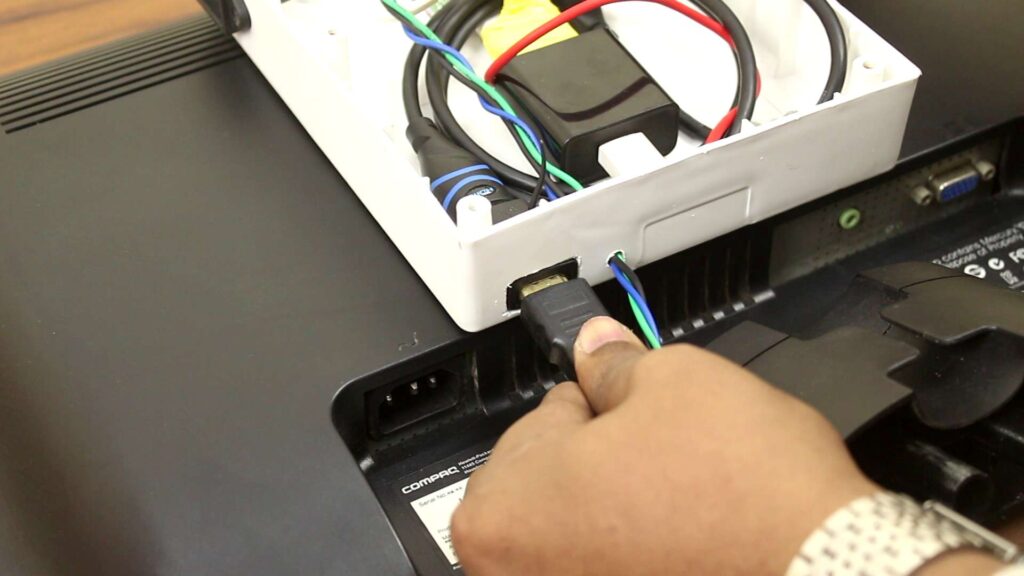
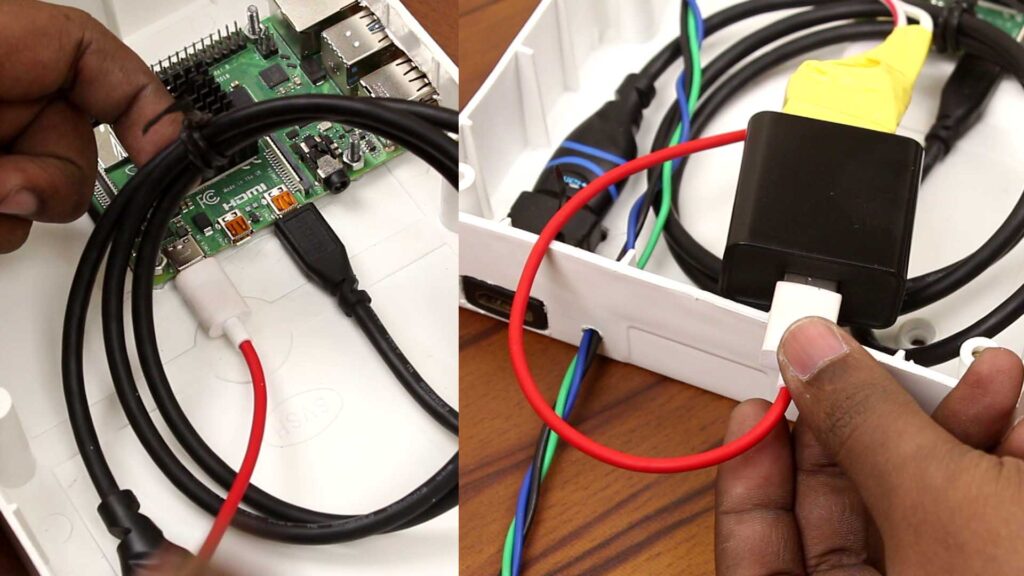
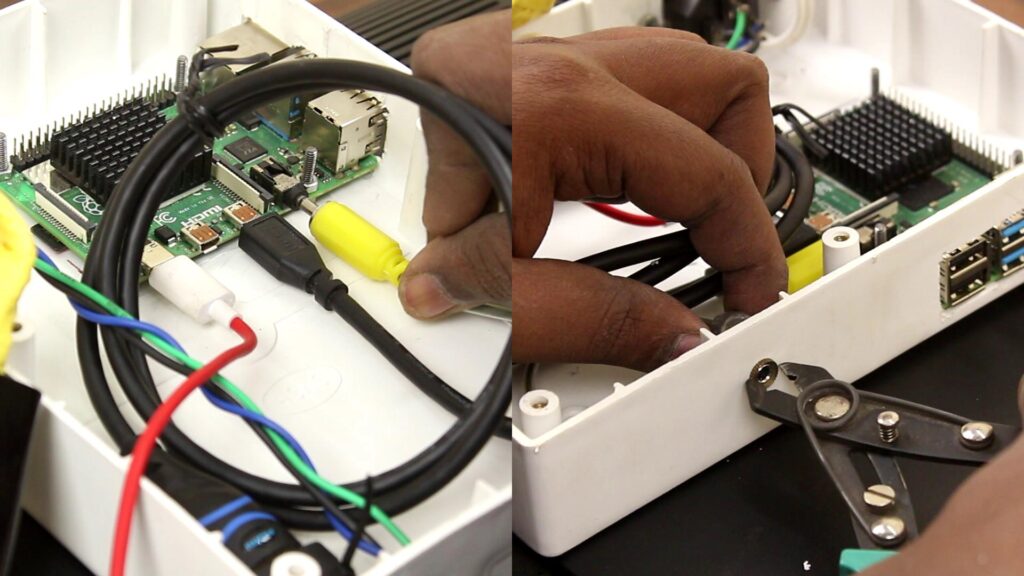
Afterwards, I have connected the mini–HDMI to HDMI Cable from the Raspberry PI to the one end of the HDMI2HDMI Converter.
So, it’s time for power, I want to use the same power adapter in the chassis but how do we get the 220v to its power prone? That’s actually pretty simple. I salvaged these from an old broken ‘5 pin plug’ socket.
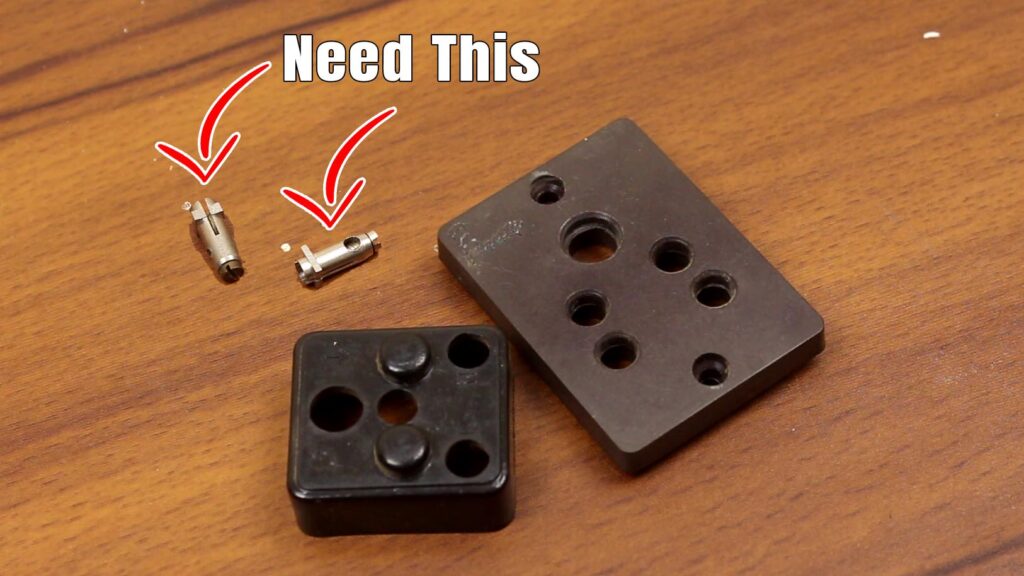
I don’t know what they call it if you know then tell me in the comments. This part will be directly connected with the adapter & this way the AC power will be easily delivered to the adapter without consuming lots of space.
Our monitor however will also get the power from this cabinet. So, we need to take out 220V AC power from it which provides the power to the monitor. That will no doubt later reduce the cable clutter. So, I have soldered 3 wires to this AC socket: Phase, neutral and earthing.
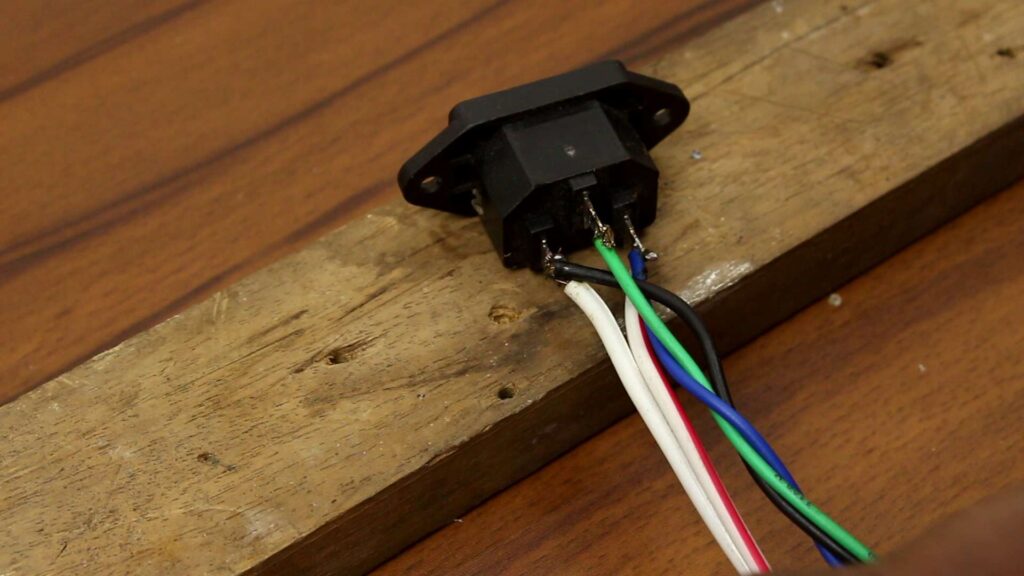
Then slid the wire out from the chassis and on the other end, I have used an AC Plug which will be connected with the monitor.
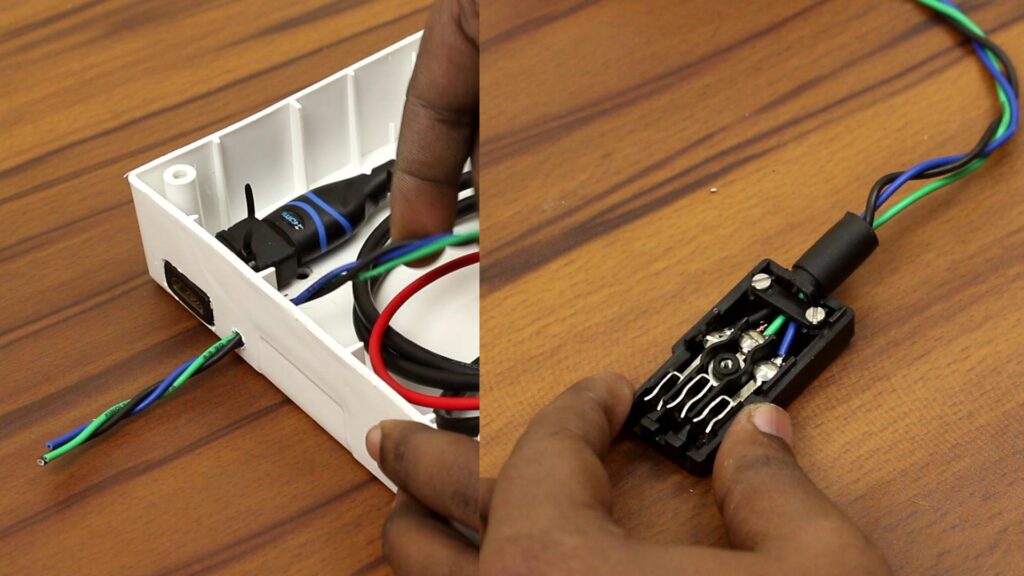
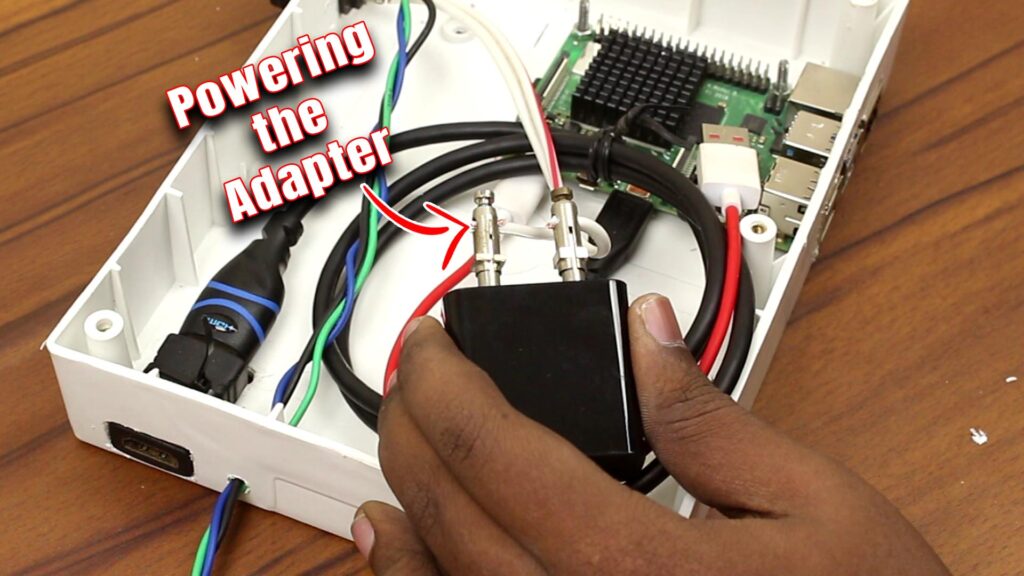
Oh, and yes during the soldering on the AC socket, I have also soldered two more wires that are phase and neutral for the 5V adapter.

After connecting the adapter with the metal socket, I have used some electric tape to cover all the high voltage expose points.

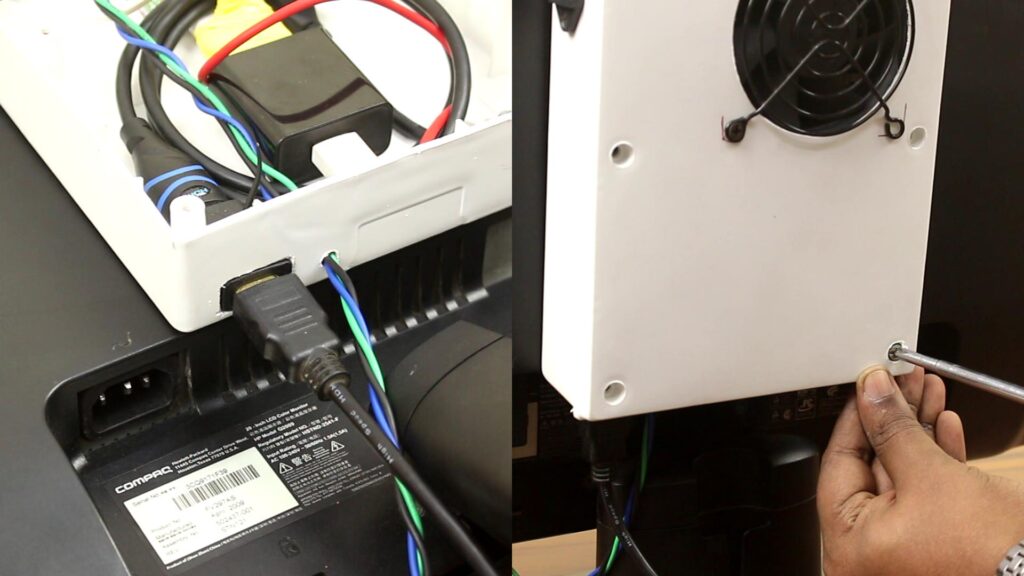
Afterward, I connect the USB type A end to the adapter and the type c end to the Pi.
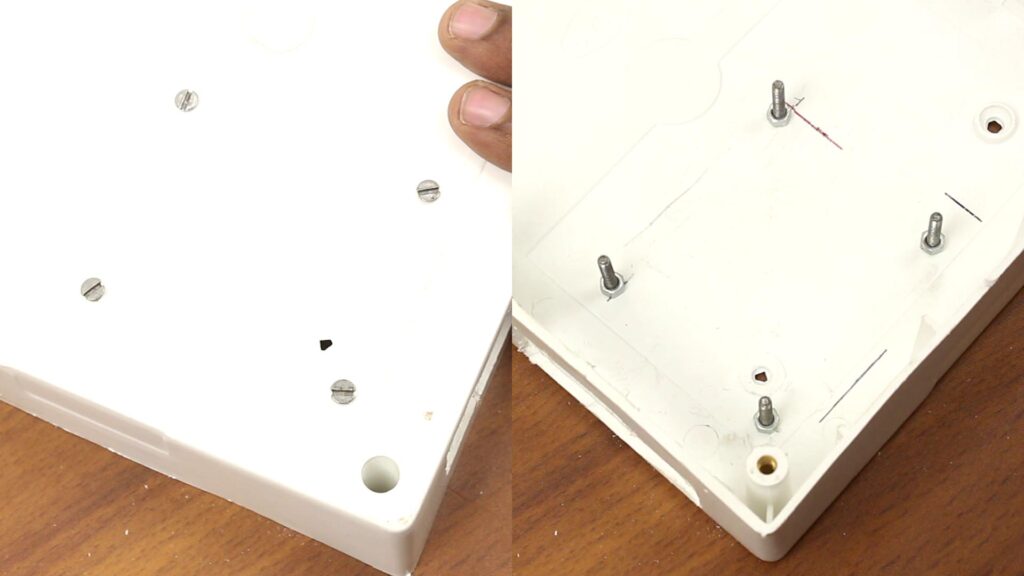
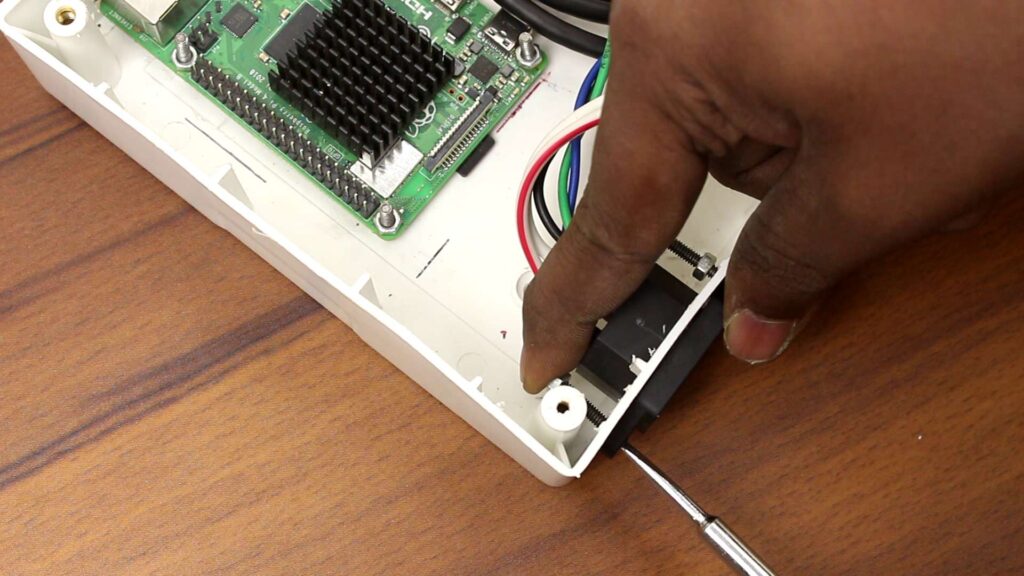
Now I can easily put the socket back in place and secure it with nuts and bolts.
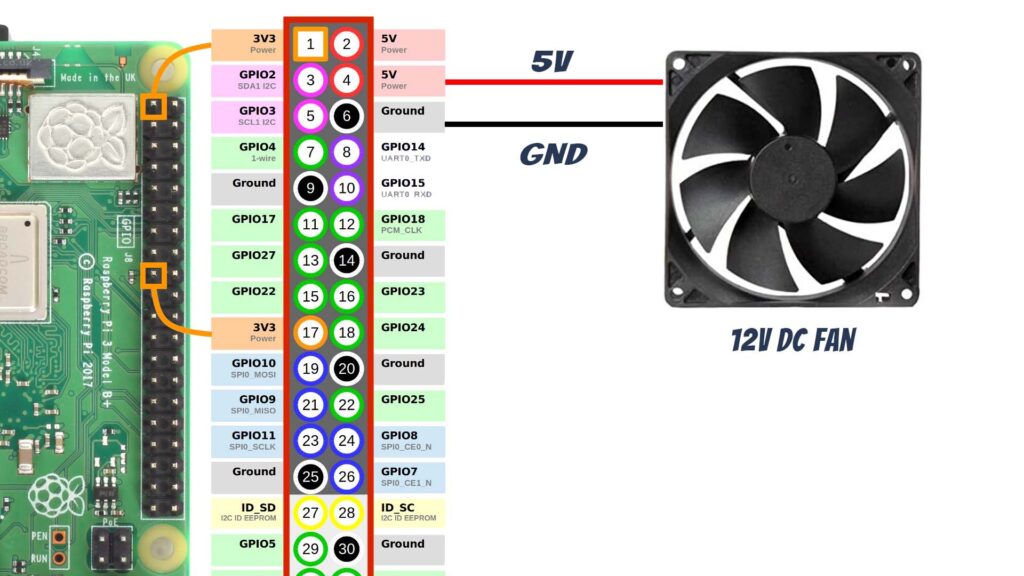
Raspberry Pi Cooling Solution
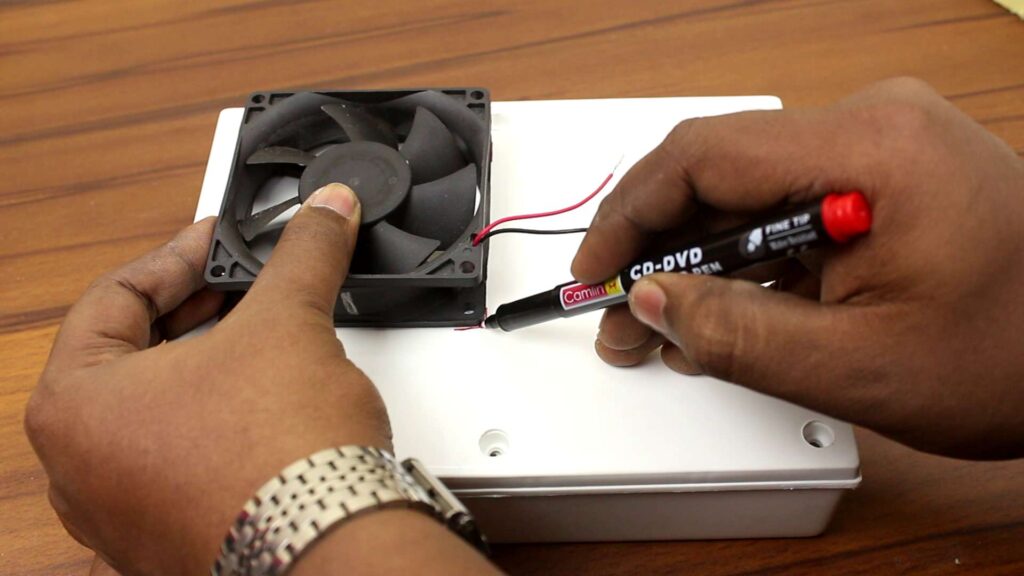
It is not forgettable that we need a fan to cool down the Raspberry Pi. I am using this 12V 3inch fan, which might overkill if I provide 12V to it but I don’t. I want a silent PC. So, I will provide 5V from the Pi to it.
To set up the fan on the lid of the box, first it should be confirmed where the Raspberry Pi is located under it and then trace the fan dimension on it.
After finding the approx. center, I drilled a pilot hole with 4mm drill bit and after enlarging the hole with 6- and 6.5-mm bit I just used my 3-inch hole saw to cut a beautiful cutout for the fan.
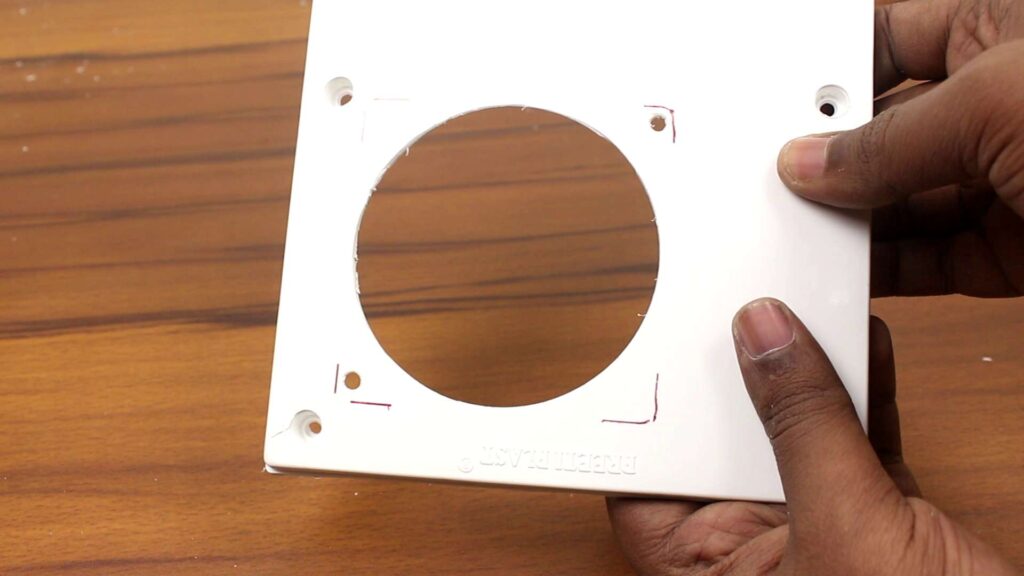
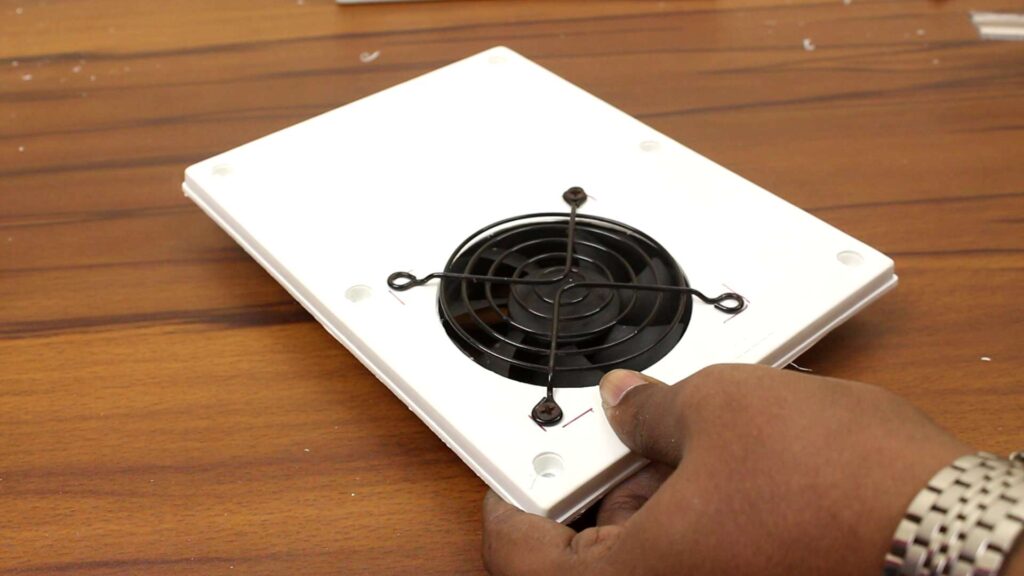
Then I have made two screw holes to fit the fan in place. After placing the fan in the right place, I used a fan grill on the box before screwing everything in place.
Now it’s time to connect the fan with the pi according to this pin configuration. I am here using Raspberry Pi’s 5V rail to connect the fan. And these are the 5V and ground pins.
Combining the Cabinet and the Monitor into a Single Device
Now I am thinking to put this chassis behind the monitor. That’s a cool idea though, but fitting it properly would be pretty challenging. But I have a solution. Notice here, this particular monitor has two screw holes for mounting it on the wall or something.
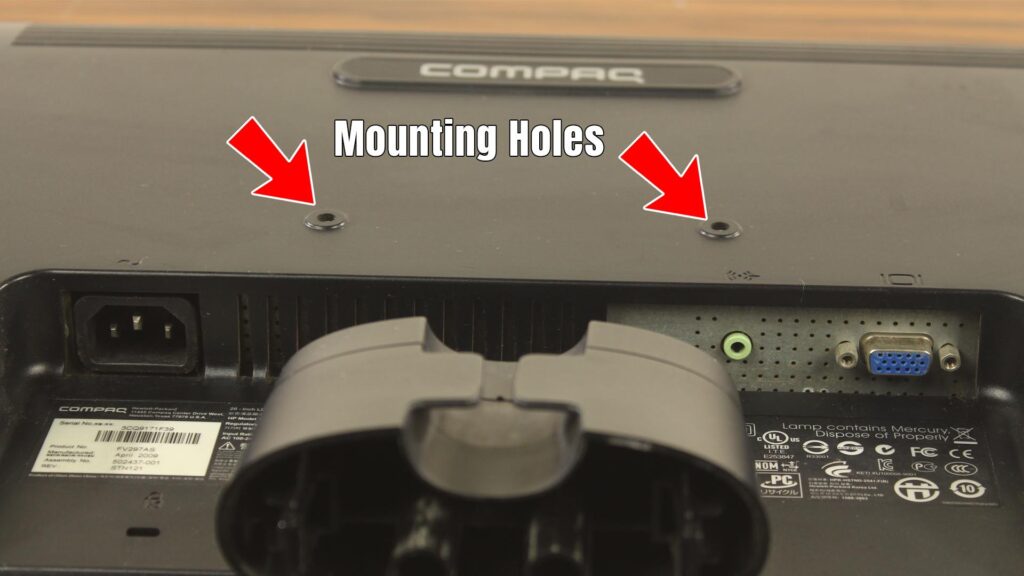
So, I have made an extra hole in the box to secure it behind the monitor. Oh, one hole was done previously by the manufacturer of the box.
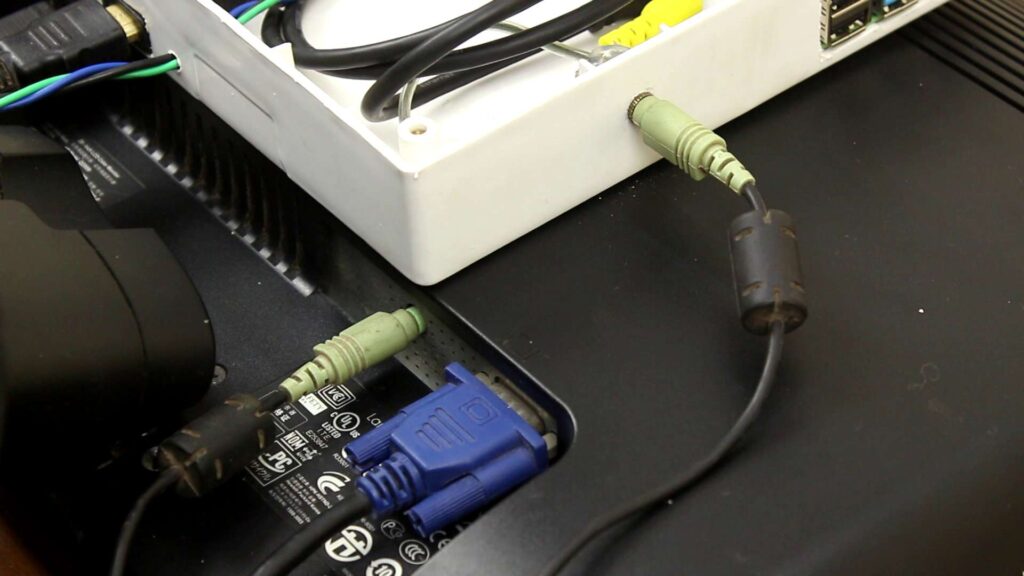
Anyway, to get access to this hole I removed the HDMI cable from the converter and then put a screw to secure the box with the monitor and on the other screw hole I put another screw to properly set the box in place.
After that, I connect the HDMI cable back in place. So, it’s time to close the enclosure with some screws which also come with the box.
Now I am going to connect this HDMI-to-VGA converter and join the monitor and the converter with a VGA cable. Now put the power cable of the monitor that comes out from this chassis.
Getting the audio Out from the Raspberry Pi
Oh, I completely forgot, I have not connected anything with the raspberry pi for the audio, So, I have again opened the enclosure lid and extend the Pi’s audio out to the case body by using a 3.5mm extender cable. Of course, one side of this cable has a Male connector and the other side has female one.
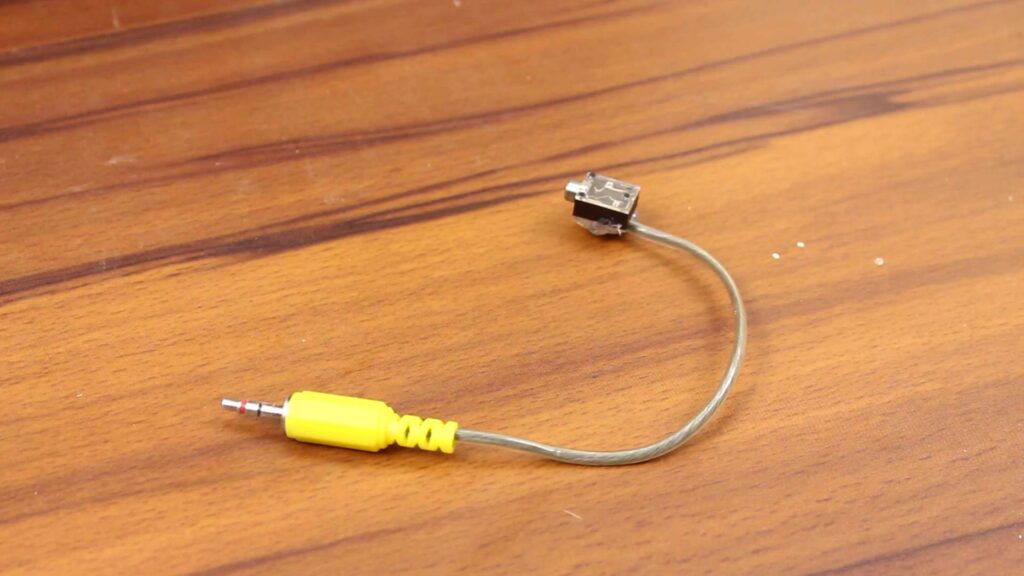
The male side enters into the Raspberry Pi’s 3.5mm socket and the female side is screwed with the enclosure by using the nut.
Although beforehand I have drilled a hole on the enclosure by using a 6mm drill bit and then I have used a file to enlarge the hole.
If you’re curious how I made this converter then this is the diagram you can follow. This is the 3.5 mm socket 3.5mm Jack and I have used speaker wire for wiring.
Now I set the lid back in place and tighten all the screws and cover the screw heads with this screw cap which also comes with the enclosure itself.

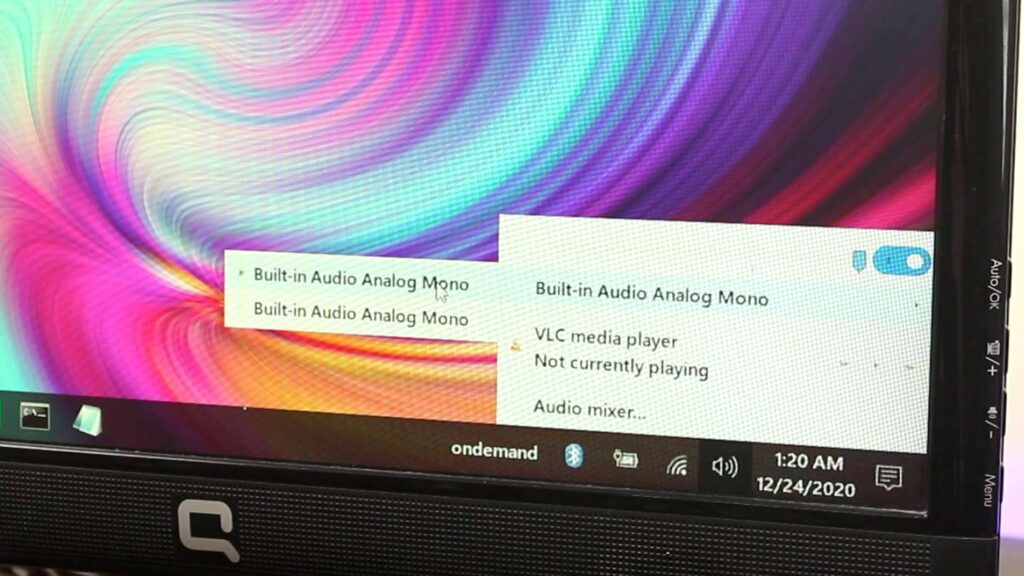
and on the software side we first right click on the speaker icon click on ‘Build-in Audio Analog Mono’ then on ‘Build-in Audio Analog Mono’ (the first option). That’s it. Now we will get the audio.
Final Touch…
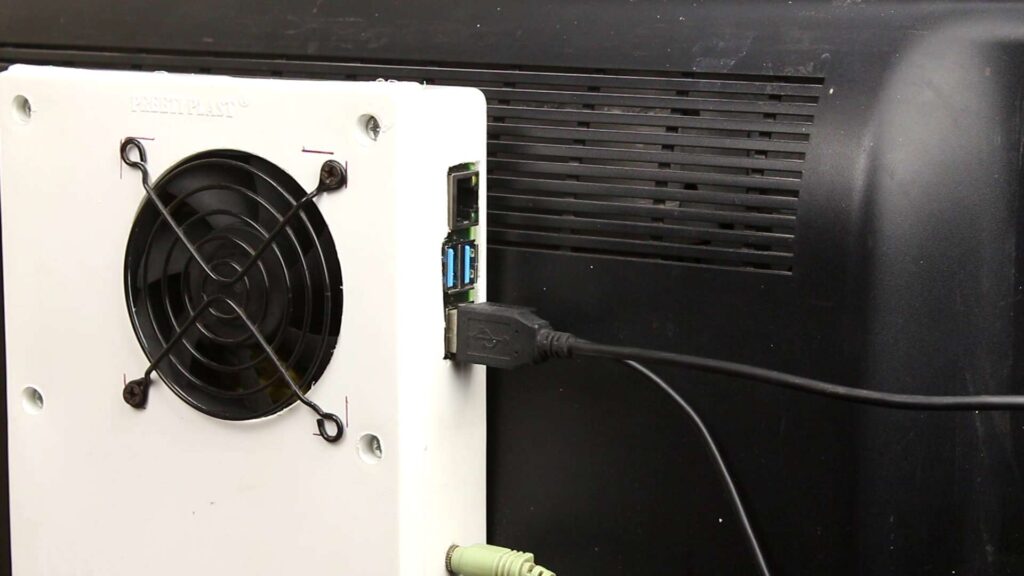
Now we need to connect the USB keyboard and mouse with the chassis AKA with the Raspberry Pi.
I can say the project is done but only one thing left which is to provide the power to the whole constellation.
After doing that, the all-in-one PC is ready to use. I can use it to watch movies, writing documents playing some small games, and anything that a computer can do but on a small scale of course.
We can’t run video editing software in Raspberry Pi and not the 3d games like Cyberpunk 2077 though Steam Comes preinstalled with the OS.
Conclusion
In the concluding lines, I must say that this is a pretty good all-in-one PC which can be useful enough if used properly. The project is cool too & moral of this project is: you don’t need to throw unused things away where you can use them by engaging your brain. Anyway, using Raspberry Pi to build an all-in-one PC is an adventurous experience to have. If you need that experience, why don’t you try this project with your old unused monitor? Watch my video on the YouTube where I have finished this project successfully.
Watch the video below for better experience. After watching that, you can read this article again for best understanding of this project.
Thanks for visiting & appreciating our work.